Publishing content to the website
To make the content and content changes visible it needs to be published within the respective navigation structure. Get to know the publishing process in the following.
Push content to the live copy
As learned in the pages app manual a website consists of a master version and - depending on the amount of language or market versions - respective live copies of the website. All content changes should be maintained within the master version.
To push your changes to the live copies you can start the process by clicking on "push master changes" in the right hand side menu. This is not only possible for one single page, but also for pages in a bulk by choosing "push master changes incl. subnodes". Within this process the editor can select the website (language) version the changes are relevant for.

Publish live copy
After pushing the latest content to the respective live copy, the publishing process can start. Therefore please choose the content page within the live copy version and click on "publish" for a single page or "publish incl. subnotes" to publish a bulk of pages of a navigation folder.

Push and Publish in one step
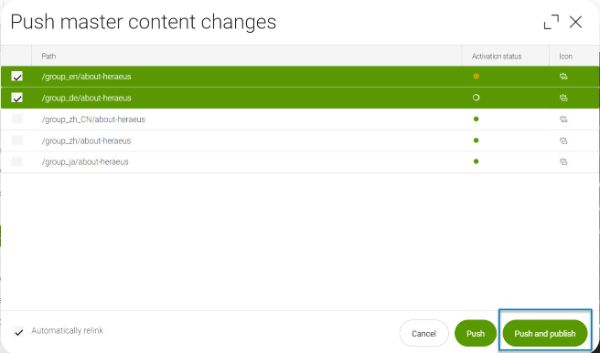
It is also possible to combine both workflows in one step. Push and Publish can be started in parallel. In that case the master content is pushed into the selected live copy version and at the same time the publishing workflow is starting. By clicking on "Push master changes" on one of the master pages the editor can select this 2in1 workflow step:

>> Specialty for CHINA <<
Please note:
As we are hosting a special web-server in China to ensure local website performance, the publishing process to this China server works differently. Please 1. PUSH the master content to the live copy and 2. PUBLISH the _zh-cn live copy separately! Both workflows in one step are not working in the China case.
Publishing Tasks
After starting the publishing process, the content is not directly published to the website domain. There is a four-eye principle workflow starting first. Just users with the role "publisher" are authorized to finally publish a page.
Working on Tasks
KeyUsers and user with a role "Publisher" have a list symbol on the upper right side.

By clicking into this task area, there is a list of all new tasks. This list can be sorted if necessary.
As a Publisher please pick one task that was assigned to you by another user or - if you started the publishing workflow by yourself - pick one or several tasks and assign it to you. Just if the task is assigned, the workflow can continue.

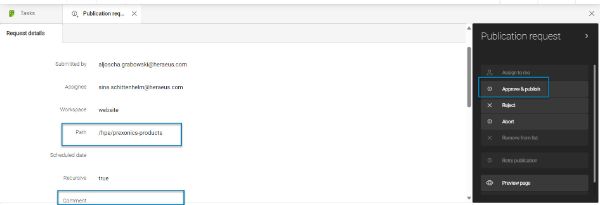
If you open a task, you will see all relevant information like
- Submitter of the publishing workflow
- Assignee of the publishing workflow (should be you as publisher)
- Path of the respective content page that should be published
- Comment from the submitter
On the right hand side menue you can now open a preview of the page to double check the page changes. If everything is ok, you can just click on "Approve and Publish" to finally get it online.
If you not agree with the changes, the workflow can be rejected as well to the submitter with a comment to might rework the content page.

Archive tasks
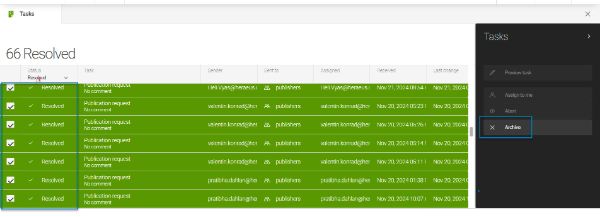
In order to keep the list of tasks clearly arranged, we strongly recommend to archive your tasks after they are resolved. To do so you can either directly click on "remove from list" within the navigation menu on the detailed task view or you select your resolved tasks in a bunddle and click on "archive".

